Wednesday, October 27, 2010

Holiday Batts!


I've been diligently carding batts upon batts for both my intermediate spinning class, and my giant Brains & Beauty Yarn holiday stocking at L&B Yarn Co. in Norman, OK.  I will have handdyed combed top, self-striping kits, and batts for sale through the holiday season.  Here's a taste:


I've got one more session each of Beginning Spindling, Intermediate Spinning/Planning Your Yarn, and Learning to Fix Your Mistakes classes coming up between now and the beginning of Dec.

I will also be teaching a limited class series designed around both knitting with handspun yarn, and knitting last-minute gifts for the holidays.  Keep an eye on L&B's class schedule for details.  

If you're already signed up for Intermediate spinning, there will be mini-batts involved!  If you're not signed up, but you'd like to be, contact L&B, I think there's one more spot in Saturday's session.  

/self-promotion.


Tuesday, October 26, 2010

For never was a story of more woe...

....that that of this darn sweater!  Okay, I realize it's not the most clever blog post ever, but the tragedy here is extreme.  And for all of you at home, muttering to yourself about my tendency toward hyperbole...shut up.

It began with the purchase of THIS yarn on a trip out to Minot, ND to visit my brother and She-to-Whom-He's-FINALLY-Proposed (yay!)  And continued with an awesome sweater pattern by the talented Ms. Ysolda Teague.   At first there was much rejoicing, although rather less eating of minstrels.


What you can't tell from the horrible photography, is that this sweater is the most perfect heathery-purply-dark-pink.  It has a lovely wooly hand and terrific structure in the knitted fabric.  It's not scratchy at all, despite not being the softest yarn ever, and is, in short, the perfect marriage of material to pattern.  

What you CAN tell from the above photograph is that I suck at taking my own self seriously.  Notice the way the back of the sweater is twice the size of the front?  Yeah, the back is 4 sizes too big...and the front is a size too small.  Allow me to digress... I teach (frequently, actually) a class at my local yarn store, cleverly entitled: Fixing Your Mistakes.  In this class, I admonish EVERYONE to ALWAYS make a gauge swatch AND to WASH and BLOCK that swatch BEFORE embarking on large scale knitting adventures.  Heck, I even believe in swatching!  It's not empty sermons week after week, I'm preaching the good word of kntting!!  Aparently, I am only preaching, and not doing anything resembling listening.  

I knit a quick swatch for this project, got a rough idea of gauge, and - upon reading that this pattern grows enormously in length, thus shrinking slightly in width - set out upon my merry way figuring I had mostly the right size.  Notice all the imprecise language in that sentence?  Yeah, well, it leads to imprecise gauge, which leads to yet another freaking sweater that doesn't fit!!  ARRRGH!  Seriously, you'd think I'd learn.  It's not like I haven't done this before.  And no, we're not going to talk about it.  All we'll say is that my previous attempts, while in no way resembling the sweater I intended to knit, have found good homes nonetheless.  This thought will sustain me as I rip this latest abomination back to whence in came.  

Take THAT, sweater curse!  Maybe my relationship with sweater knitting is star-cross'd and ill-fated.  Sweaters are stupid anyway.  

So...I started a vest!  See?


That's Milly.  Isn't she beautiful?  I'm in love with the latticework pattern.  It's just the right amount of delicate and interesting.  The yarn is pretty fabulous, too.  This humble vest marks the first time I've ever used the recommended yarn for a pattern.  

Milly is designed by none other than Ms. Linden Down, whose patterns trend heavily toward the classic and elegant.  They all look like something Audrey Hepburn would wear, and are flattering in such a way that they will make you look like Audrey Hepburn.   I love pretty much everything she's designed, and her patterns are well-written.  (Linden and are are secretly forming a mutual-admiration society.  I should probably tell her...)  This particular pattern is a little involved, and may or may not have been ripped back twice in the same evening before I decided that I really should pay attention.  We shall not speak of gauge.  

Lastly, seeing as I have decided to forever put aside the knitting of sweaters, this is probably not the droid you're looking for.  


At least it's pretty...


Friday, October 22, 2010

Yarn and an Earthquake!

Isn't it endearing how I throw caution to the wind, and title so many of my blog posts to end with an exclamation point!  Apparently, I'm rather excited - and on a regular basis - in text.

Moving on.  

We had an earthquake last week!  It was only a modest 4.3, but our house has seen better days (it was built in the 50's by the lowest bidder) and got a little stressed out.  We've had some hairline cracks in our walls for awhile, but the earthquake opened up quite a few new ones, and expanded some old ones enough to make me nervous.  

See?


And here...


And the Mack Daddy! (<--that's way funnier if you read it in your best Hank Hill voice, but really, aren't most things?)


I called our property management company to come check it out, and make sure my house isn't going to fall down around me.  They sent out a very nice duo of maintenance guys, who hemmed and hawed and agreed that yes, those were some mighty impressive cracks.  And then they got out their spackle and some paint and filled 'em right in!  Well, at least now they look good.  

We're relatively sure our house won't fall to rubble anytime in the near future.  All the big cracks are along lines of obvious stress that have been spackled and painted over probably dozens of times.  Really.  You can't tell from the photos, but this house has been painted so many times, we joke that all the rooms are actually 6 inches wider and longer than they look.  The cracked placed stand out at least another quarter inch from all the layers of "fixing" over the years.  Poor old house.  

And now for yarn!!!  I've been spinning like a fiend lately.  First there was a trip to Yarn School in Harveyville, KS with a dear friend.  We had a blast, and learned more than we each thought it was possible to know about dyeing and spinning and carding and combing and..... Unfortunately, my chronic lack-of-picture-taking disorder was in high gear and I have nary a shot of Yarn school to share.  But, I do have yarn!

Here is my Hello Yarn Corriedale in "Brittle" that was my bonus for bringing my own wheel.  It might actually be my favorite handspun EVER.  You can tell by the capslock that I'm serious. 

Next up is a batt I spun.  It was my first installment of the talented Josette's HappyHooves Batt Club.  This was a luscious batt, with just the right amount of sparkle.  Keep in mind my picture taking disease and you'll understand why there's no "before" shot.  Certain almost-five-year-olds may or may not have claimed this for "sparkly socks."  They'll probably show up in her Christmas stocking.  


This is a truly awful photo of a truly beautiful yarn.  Hello Yarn Corriedale in "Grouch."  I think I'm on a corriedale kick lately.  I'm also on a sock kick, and they were made for each other.  This may become knee socks if I can ever overcome my fear of calf-shaping.  Sigh....


Lastly is Hello Yarn Targhee in "Parritch."  This is one of the prettiest colorways I've every seen.  It's so subtle and soft.  One of my fellow yarnschoolers wore a seriously clever cowl to breakfast one morning. I spun this Targhee super-bulky in an attempt to recreate said cowl.  As soon as I'm done, I'll post the details.  


There was also a sweater disaster of which I'm not ready to speak.  And a cowl to make up for it.  And a vest that may be my new obsession.  Stay tuned!


Thursday, October 7, 2010

For Katherine

Alternate Title: The Weirdest Thing I Do (in public)


I won't go into details, but some time ago I started sewing cloth menstrual pads.  (if this is an indication that you'd like to skip this post - now is the time :)  We cloth diapered the kids, and I made lots of those, so mamapads (or mamacloth, mooncloth what have you) didn't really seem either all that hard, or much of a stretch.   I won't go into the numerous benefits of cloth for women, but if you're interested there is lots of information out there.

In any case, I started making them for friends, and eventually for actual paying customers.  It's been a pretty successful little side business and I really enjoy it.  I love knitting around and around in a circle, and these pads seem to be my sewing equivalent of that.

I've recently had a good friend ask me how I make them.  They're super-easy, and ripe for upcycling.  Frequently I use old t-shirts.  Although, let's be fair, I use either old t-shirts, or my husband's old pants, to make just about everything.

So, here's a down-and-dirty How To Sew Your Own Cloth Pads Tutorial.  You don't even need a serger,  which is a bonus as I don't have one.

Final note:  These pads in the tutorial are NOT the same as the pads I sell.  The ones for sale use organic cotton batting for the inners and tend to be a bit softer and a bit more absorbent.  But, the ones pictured below work just fine.

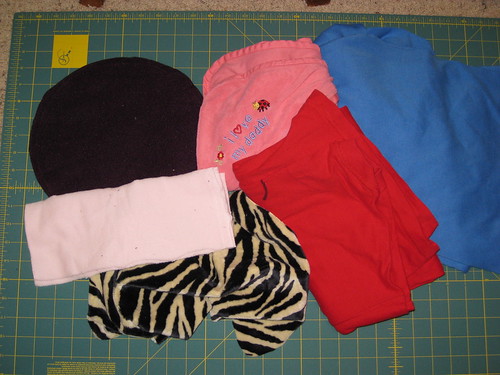
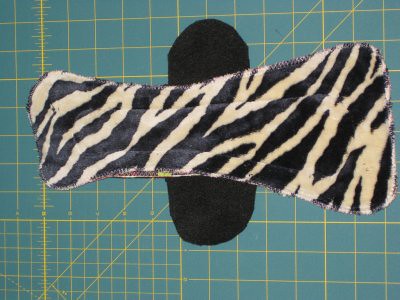
Step 1: Amass your materials.  This can involve something as simple as raiding your things-nobody-wears-anymore stash.  You need things that are 95-100% cotton.  T-shirts with a bit of spandex or lycra are fine, but I wouldn't use them as the very top layer.  In this picture (left to right, top to bottom) I've got a circle of purple Malden Mills Fleece, a pink hooded baby towel, some blue knit fabric scraps, some light pink microfleece, a red t-shirt, and some tiger print Minkee.


Step 2: Don't try to figure out what's written on the t-shirt, it's an inside joke...and only part of one.   I'm laying out all my materials (with the exception of the bottom, water-resistant layer) in a big sandwich. I've cut the bottom off the t-shirt to make it easier to work with.  There's also a layer of the blue knit fabric under the t-shirt.


Lay your materials out in the order you want them stacked, bottom layer on the bottom. Top layer on the top.  Par example:

________________   <---- microfleece/cotton bamboo/or Minkee (this layer can also be just cotton)
________________  <----- t-shirt layer

You can put anything that's 100% cotton as the absorbent "t-shirt" layer, and use as many absorbent layers as you wish.  You will have to sew through all these layers at the same time, so be a little cautious.   3 or 4 layers of cotton will do a LOT of absorbing.

Step 3:  Trace your pattern.  And by pattern, I mean a commercial pad, or an elongated oval you've cut out of a paper bag.  I'm using a pad I made awhile ago.  I also have paper patterns all over the place.  Don't make them too wide or they'll just bunch up when you use them.  3 inches across is plenty.  Make them as long as you want.  I like to have a variety of long and shorter ones at my disposal.  The length will be 100% personal preference.


Step 4:   Pin your layers together.  I have a walking foot on my sewing machine, so I only use a couple pins.  If you don't have a walking foot, I'd use way more pins to keep all the layers where you want them.


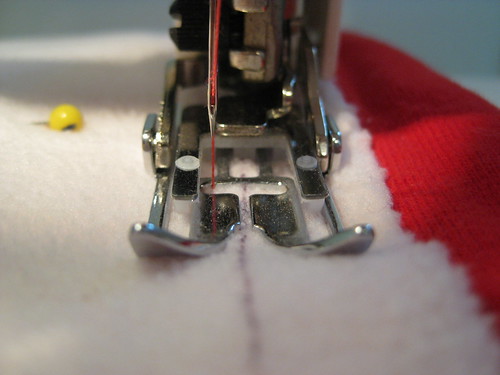
Step 5:  Set your needle all the way to the left position.  You want your sewing foot to be centered on the black tracing line (I used a sharpie to trace mine) but you want the seam to be a bit INSIDE the tracing line.  Sew all the way around like this with a basic straight stitch.


Step 6:  When you've sewn all the way around the outside of your oval, use that seam as a guide and sew another oval about an inch (give or take) inside that one.   Getting the curves to look good is more art than science.  Don't worry if they're wonky, wonky works just as well.


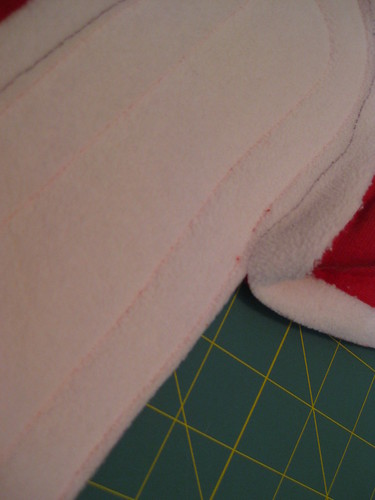
Step 7:  Carefully cut your ovals out along the black line, leaving just a fraction of an inch of fabric outside your outer seam.


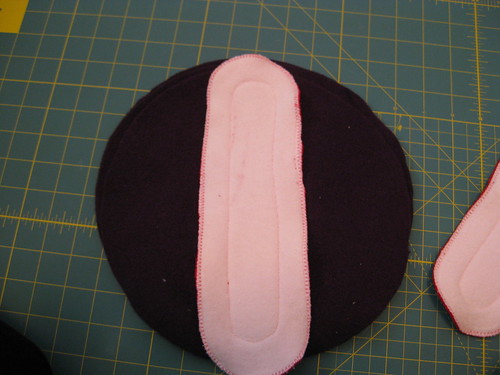
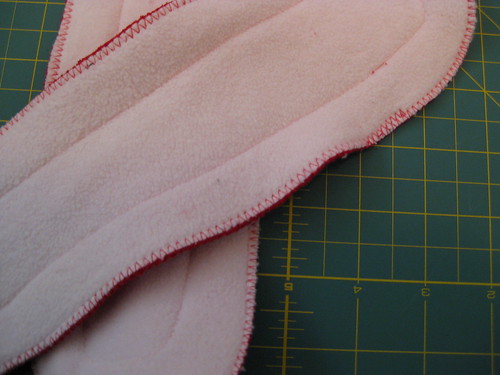
Step 8:  Set your machine to the widest zigzag stitch, decreasing the stitch length slightly, and zigzag over the entire edge of your oval.  This will give you a nice finished edge.  If you've used all knit and fleece fabric, your materials won't fray in the wash.  If you've used any flannel, you may get some stray threads out the sides the first couple of times you wash.  They usually pull right out, or clip off easily - no worries.


Step 8:  Moisture-proofing.  You have many many many options for this step.  Lots of people like to sew on a Polyurethane Laminate (PUL) backing.  I don't like PUL because it doesn't breathe.  I like fleece.  A lot.  I've used all kinds of fleece.  Usually, a good microfleece works just fine as a moisture barrier.  (if your pads are leaking through the back, you're wearing them too long)  I've also used Malden Mills fleece (both 100 and 200 wt.) which is lovely.  Cheap anti-pill fleece from the fabric store works too, it just doesn't usually look as nice, and can be a little bulky.

The easiest way to make a backing is to cut a circle of fleece, attach your pad at the top and bottom (use more zigzag stitch,) and you're done.  They're a bit bulky this way, but hoo-BOY are they full coverage. Lay the pad in your unders, tuck the flaps down the sides of the crotch, pull and go.  If the flaps are a bit much, feel free to trim them down a bit.


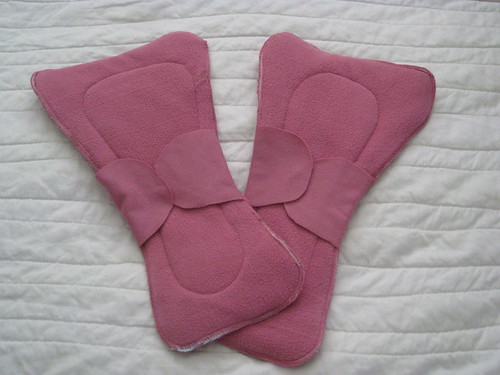
Alternately, I've been known to pin my pads to a large piece of fleece, zigzag around the whole thing, and cut them out carefully, adding little wings in the process.   Like so (these are some of my very first pads - don't judge!)


You can vary the size and shape according to your wants/needs.  This one below is a post-partum/overnight pad.  I think the backing for this one is a thrifted fleece jacket.  


That's really, truly, all there is to it.  You'll be surprised at how comfortable these are.  You can use microfleece, microsuede, or Minkee as a top layer if you'd like a bit more of a stay-dry feeling.  All those fabrics are 100% polyester and non-absorbent.  Moisture flows through them and is collected in the cotton layers.  Minkee is downright heavenly for post-partum use.  Oh yeah. 

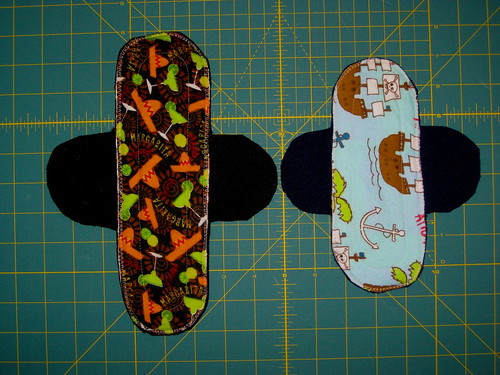
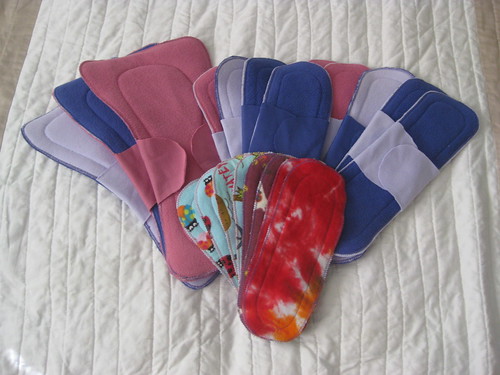
And, since that entire post wasn't revealing enough, I'll leave you with a couple pictures of custom pads I've made and sold!


Happy Sewing!